Jan 21, 2017

Heart to heart

Who wants Kathy Barrick's Black Heart?
Leave your name/initials in a comment or email me (click on the postcard).

A quick offer to be mailed out Monday, so Sunday at 8pm I will draw a name if more than one.  You can also order this chart on her Etsy site https://www.etsy.com/shop/kathybarrick.


*****************************


Jan 20, 2017

Heart-burn

Some times, finishing goes smoothly.  Other times, it burns more than a flash.  I had no problems tracing a heart, centering, sewing the backing. 
But that damn cleavage always is an issue with me.   It's fine until the stuffing enters.  All worked out in the end but it was a real test.  I passed.


Finished the heart using my usual method of just folding paper and cutting a heart shape until it fits.  Real technical.  I hate measuring.  


Once it's close, I hold it up to the light and pin
into place, trace on the backside with a Frixion pen.  I always leave a decent allowance since I can sew it closer if need be. 


 Instead of leaving a side opening, I sewed around the entire heart and used my envelope method for the back.  Because of the fricking cleavage, I seamed a short section at the top and the very bottom instead of having two halves.  Pressed the seam allowance in and clipped the excess.


I used the 1" thick quilt batting cut to shape, decided to add another layer of it, then steamed. Carol of http://stitchingdream.blogspot.com/ wrote about her favorite bagged fill and once I bought it, there was no going back.  She recommended Touch of Silk and I love it.  Never thought there would be a difference but there is.  I steam and smash the fill until I get the density I want which would always flatten, almost melt, the batting.  This brand will condense the fill and give a nice feel, but doesn't harden like the other.  In fact, you could actually remove it and pull it apart to re-fluff it, even after steaming.  The quilt batting (yardage type) worked well so I didn't use this product for the heart, but do for a lot of finishes.
 
So what's next?  Another small sampler?  Or heart?  Not sure, but I am certainly loving my new bench.  Magnifiers, tools, and baskets with projects, all hidden but handy. 
 
Have a good weekend!
Thanks for visiting.
 
*******************************

Jan 19, 2017

That heart of mine

Changes as usual!  Went with the peacock instead of the angel, gave the bee wider wings to take up the space (sorry for the bad photo).  All in all, will work out to a nice shape.  Hot flashes have been brutal for the last few days so I will not attempt sewing the finish until patience returns.  I've been waiting for years and it hasn't shown up yet so why would I even say that!
 
 Carol, the stitcher of the inspiration for this project, emailed me with the information on her heart.  This looks very blue to me on my screen but it is not.  Her linen choice was 40 count R&R Ink Spot Black.  She said the actual color is a washed out black, and shows lighter in the photo.  Fabulous work Carol!
 
Have a great day.
Thanks for visiting.
 
p.s.  Cathleen is fine - linen is hers.
***************************************

Jan 18, 2017

The bench!

For a few years now, I've wanted something in front of the sofa that I can store stitching in.  I have the typical shaker looking bench which is narrow enough for a small room, and tried baskets and boxes on top of it.  Wasn't working out too well because I needed two hands to open the lid and retrieve an item.  I tried the bench with the hinged lid but I had to remove all items from the top before opening it.  I had a solution but never got around to following through. 
 
Because the last several projects involved changing not only colors, but design, I had way too much of a mess around me.  My DMC guides were referred to constantly for thread colors, and pads and pencils for sketching, and bags of floss that didn't work.  That forced me to try my solution.
 (Notice how many little red foils are mixed in.)
 
 
And here it is.  This is the typical style of bench that most of the shops had around here (and several that we made).
And here it is now.  We just cut out the front apron, touched up with some stain, added a board inside for a shelf!  This will go back in front of the sofa, open shelf facing me, and I can have easy access to my DMC guide, current project, tablets, and these black baskets from Michael's fit perfectly.  It will be nice to have a concealed spot to put all the accessories and keep the area much neater.  There's even room for a few books and it may not be a lot of storage but certainly enough for now. 

I haven't heard from Cathleen Nelson yet about the fabric.  I did reply to her email and listed her name in a post, but maybe other events have delayed her response.  If I don't hear from her soon, I will draw another name.  Hope all is well.
 
Thanks for visiting.
 
************************************

Jan 17, 2017

In Paint

Lots of big photos coming up!
Several of you have asked how I manipulate photos to test colors and placement.  I have no idea what equipment is required to do those YouTube videos and show you, but that would be fun!  So here's the best I can do.  A few screen shots for the basics.
 
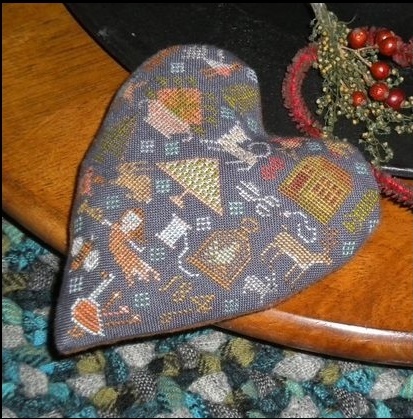
The more I looked at the Heart, I was concerned that the blue bird was too close to the middle cleavage (or whatever you call that dip in the center).  So I took the photo, opened in Paint, and rotated the bird horizontal so the tail would be out of the way.  Here's how.
 
First, right click on your photo from it's current location (Pictures folder, Photo Gallery, camera file) and choose Open with ..... Paint.  If the photo is too large, click on VIEW at the top menu and then  .. zoom out. 
On the Paint HOME page, click on SELECT (you can't copy or paste without it).  Your little cursor cross can then be positioned in the top corner area of what you want to change.  Hold your left button/touchpad while dragging the cross around the area, let go. The dotted lines around the bird indicate the "selection". 
 
  Once you let go, move the cursor into the selection area, right click .....COPY.  Then right click .. PASTE.  Your selection will appear in the top left.  Don't touch anything or it will stick.  Move the cursor into the paste and drag it to (hold down mouse/touchpad) where you want.
 
Let go (lift off) when positioned, move out of the area, and click to finish the move.  Not right?  Just hit the top left blue BACK arrow and start over.  You can hit it several times to go back even further to remove prior actions.  You can also just hold the mouse/touchpad and drag your selection to the new location WITHOUT right clicking for copy and paste, but that area will then be a vacant spot of white. 
 
 
You can also select an area of linen to copy and paste over an area to block out any stitching.  This is mostly how I removed the diamond shapes in the original chart, some were covered with the brush option. 
But regardless of how messy the work is, you can get a sense of the changes before actually stitching, and determine if they are a good or bad idea.  Many times, the new move will not cover an area completely and a small selection of bare linen can be pasted to hide it.
 
In this case, I wanted to rotate the bird so after making the selection with the cursor, I clicked ROTATE on the menu, and chose FLIP HORIZONTAL, which did just that.  You can continue choosing the position to rotate before you anchor it.  Not right?  Just hit that blue arrow and start again. 
 
When you are finished, you will have the option to save the photo.  IF YOU DO, your original is gone and you have the changed photo.  But.  The thing to do - click FILE, SAVE AS, JPEG picture, and just add a number or letter to the original file name when the box opens, and then save.  That way, you keep the original and also created a new file with the changes.
And keep in mind - you can close the entire page and choose DON'T SAVE, which will go back to the start.  Remember that clicking the blue arrow to go back will remove any errors or changes you want to do over before ending your work. 
 
I wanted it over more, and also the brown bird, so I selected and moved both to the right.  There will be overlaps and such but it will give a general idea as to whether the changes you are considering will work.   And because I did this, I can see now it will be much better for the heart shape giving me more space for the center cut, worth the time to remove and restitch. 
 
 
I hope this explains the Paint method I use, maybe one day I'll be a FlossTube star and show you more detail .
 
This also works for changing colors, but not as easily. Same method if you have an area of the color you are considering, with small copy and paste sections.  Otherwise, you must use the brush menu, edit the colors, and it takes a while.
 
Did I make it harder or easier for you to try??
 Or was it a big snooze fest?
********************************

Jan 16, 2017

Mojo working

Hey!  I thought I would have given up by now on motif-icating.  I did have problems with the basket so I simplified for my aptitude.  Just a few more and I need to decide on moving the peacock in place of the angel or stitching as is.  I had a noticeable error in the last photo.  The birdcage was missing its top.  I thought it looked odd.
  I'm still working on Santa's bell finish and simplified that too. 
 
All went well at the hospital today, except for the slight whiplash after the wheelchair turned into a catapult.  I had trouble with the new models at the Diagnostic Center, those were hand brakes.  The hospital's are like a lounge chair with side arms that raise and a long bar across the top that needs to be held tight.  If you let it go, boom.  Brakes.  Sudden stop.  Patients lunged forward.  We had a good laugh since this has happened so many times before, starting with the speed bumps in the parking lot.  As we checked into the Heart Center, we were greeted by a memorial plaque for our doctor that recently passed.  So sad.
 
I've been on a kick for the Cowboy Candy we made this year.  Jalapenos in a sweet heavy syrup, the hot/sweet is heaven!  And I don't care for hot peppers.  A baguette slice, a few candy, and a little slice of cheese, under the broiler real quick and I can't stop eating them.
 
As for the sticky chicken, it's hard to give a recipe.  Mom made this and called it sticky chicken because ... it is.  Sticky.  You can use whatever parts you prefer (I like dark).  In a plastic bag I put 1/2 cup flour, 3/4 tsp. paprika, 1 tsp. cinnamon (or less), less than 1/8 tsp cloves (or none if you don't like clove).  Shake to blend and then add chicken pieces to coat, brown in canola oil, and transfer to baking dish.  Slice potatoes into quarters or eighths, par boil until starting to soften.  Drain and add to baking dish.  Sprinkle some paprika and cinnamon over, salt over all.  Add 1/4 to 1/2 stick of butter to browning skillet (depending on how much oil is left), add a little water, melt and blend scraping any bits.  Pour this over potatoes and chicken, cover loosely and bake at 350 for a half hour to 45 minutes.  That's it.  We like a little more cinnamon and a touch more cloves which can be added after baking if needed, or to the liquid before pouring over.
 
Weather has warmed somewhat and Mark will be golfing again.  I'll be going around the house making lists of projects.  Simplify.


Take care, be safe, stitch happy.
 
*************************************
 
 
Related Posts Plugin for WordPress, Blogger...