
...or how to stitch a sampler after it's framed. Thank you for suggesting a curved needle. Great idea! I fixed Mary right after I posted, but will certainly remember that for next time. Yes, I'm sure there will be a next time.

I started with the loop knot method and picked up the threads from the bottom of the cross in the prior stitch.
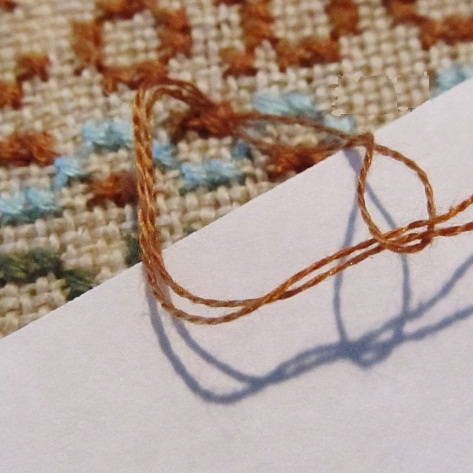 Pulled through the loop, slipped the needle under the fabric, and came up at the correct spot. The loop disappeared and I can't even tell where it was. Keeping the needle flat, I used a piece of paper to cover the linen starting directly where the needle came out.
 This made it really easy to stitch without snagging onto any other threads. Ended with the needle beneath the fabric to catch the back threads and it worked.
Done.

Good thing I didn't have glass installed! I keep forgetting to ask my husband about our little air compressor for inflating tires. Instead of buying canned air, I wonder if there is a way to depress the valve and use that contraption to clean the samplers. Or blow them off the wall. Nah. This isn't the type you attach tools to so it can't be that powerful. I'll let you know.
I know there will always be the debate about glass/no glass and it really is personal preference. Do you remember the post showing the inside of the sampler's glass? I removed the piece to take a photo without glare, and saw why they always looked dull even though the outside of the glass was clean.
 I think that's what did it for me. And yes, they may get dusty without protection and eventually change somewhat, but that's the look we try to achieve for reproductions, and being pressed against this film can't be good either. Being completely sealed, this must be an off-gas from the threads. Or the mounting board? Acid free yes, but there are glues and binders in mat board and who knows what in foam. Spacers would prevent the build up where the floss touches but would it still release something? So do they need to breathe? Is it because of something in my house? Another thing I noticed - the old pieces that didn't have the paper dust cover were not as filmy. ??? Pros and cons for both methods and I like the elegant beauties behind glass, and the primitive repro's bare naked. As I'm typing this, I'm looking at large Hannah on the wall. The sun angles here briefly only at sunset in spring before the trees leaf, and I can see it needs to be unassembled and cleaned also. Take a look at how dull and hazy this is.

This is another 20+ year old piece. After cleaning the others, big difference! I didn't intend to open a can of worms again but the debate will continue as long as there are stitchers.
I'll shut up now.
Have a great day! Thanks for visiting.
xxxxxxxxxxxxxxxx

17 comments:
Wow, I am so happy for you everything turned out so well and thanks for showing us how you did it. I was sure hoping you would.It is a beautiful piece, either way but I think the missing stitches would have driven you crazy in time.
Marly!!! My hero! You rock! Good for you, you did it!
I am a no glass girl. ;)
You always have such interesting things on your blog posts. I love it! I never would have thought that you could put stitches into a framed sampler, but now I know. I probably leave a few stitches out of just about every sampler that I stitch.
And I've had worries about the glass on the pieces, but I always use it, just make sure that there are spacers. I have one sampler though that I did years ago that I put that non-glare glass on. What a no-no. I can see where the colors have leeched onto the glass and I'm afraid to remove it for fear that whatever was in that glass has weakened the threads and they'll come off. Now I only use museum glass.
Awesome work!
You did a great job. A good way to keep dust off your sampler is to lay a piece of plastic needlepoint canvas on them and use your upholstery attachment to vacuum. The stitches are safe because the vacuum does not touch the Stitchery.
Sweet stitching xx
Amazing job ... as always. You really pulled this one off and it looks incredible. I am leaning towards NO GLASS. Pat had an excellent solution keeping the dust off. Will remember this for sure.
Thanks girls for sharing!
Peace & Blessings, Barb
I just use a baby brush to brush my samplers off once a month. I just do it very gently.. I don't care for glass on my samplers... But that is me!
Linda in VA
Good job on the fix!
Mission accomplished fixing the sampler.... love how you tackled the job!!!
OOOOOOOh...fantastic fix!!!
Judy heartland stitcher
Amazing fix! I really think it was fine as it was but now it's perfection ... something we both like : )
A great job of correcting. It is hard to know what to do. After seeing needle work for sale in antique shops, I think it is best to do what makes me happy. Who knows if any one will want my things when I'm gone??!!
Very resourceful in putting in those missing stitches! I don't think I would have thought to try what you did.
You gave me something to think about with the glass over needlework. I tend to frame with glass, but that's nasty what happened with that piece. I do need to insist on spacers I think.
I also don't see why a compressor wouldn't work to blow the dust off, or get a can of the dust remover like you use on computers.
What a great save, Marly!! You'd never know the stitches were missing :) I'm another who doesn't use glass--I think the stitching shows up so much better and I have pieces that are over 30 years old that are holding up just fine :)
I knew you would find a way to finish those stitches ... good job!
Just my thoughts on the compressed air from a can -- ever notice that if you spray the canned air in one place, there is a white foam that forms there? Doesn't that hurt needlework?
I have a piece that I stitched for my grandma over 30 years ago. I had it framed with glass and it looks as good as the day I had it framed. There is a mat between the fabric and the frame and the glass does not touch the fabric at all. One rule I always follow is never have the fabric touch the glass and if no mat is used, spacers should be placed between the fabric and the frame.
I have always heard that mold can form on the fabric if it is touching the glass. With all the dust and dirt in rural IL, I'd never be able to blow the dust off a stitched piece.
Just had a thought, use a hair dryer (like they suggest for fake flowers) on the cool setting instead of canned air or a compressor.
Post a Comment