
 Hi everyone. I receive a lot of emails from stitchers about finishing the pear designs, so today I snapped a few while doing the latest. Lots of boring photos in this post. First off, here it is - pattern needs tweaked a little and I will post it this weekend.
I use the template that I originally posted with the first pear, on a bright color cardstock (so I can locate it). Whether it be square or shaped, I always fold my templates to make sure they are the same each side, and then mark the fold in black. Depending on the pear size, I resize it on the copier. After fusing the interfacing to the linen and the backing fabric, I hold the linen up to a window with the template on the backside.
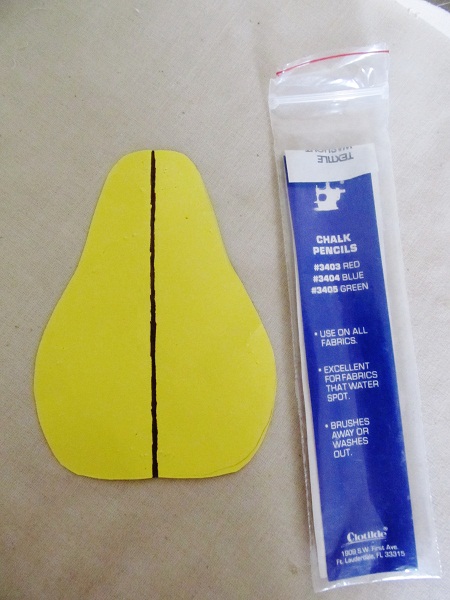

You can see the center line through the linen which helps a lot. Two pins to hold it, and then I use a chalk pencil to outline right onto the interfacing. This is NOT the cut line, but the stitching guide. Some times I go a little over since I can always go back to make it a little smaller. I always use basting 8-10 stitches/inch to make it easier to remove if necessary and it holds with the interfacing very well.


Turn it right side out to check the shape and then either sew it in further or remove the stitching to make it larger (that has never happened), or hopefully be perfectly pleased and no changes are needed! Clip the seams and trim the excess fabric.


The bottom is folded and pressed as is the seam to open it. I use a plastic letter opener to crisp the seams by sliding it between the backing and the seam allowance, never on the linen side.


A smaller piece of cardstock is inserted (so the batting slides easily) and after cutting the batting smaller than the original template, slid inside to fit the shape. If I use Mylar to hold the shape, it's cut slightly smaller than the pear and kept in. For a flatter pear, one layer of the thickest batt, but usually it's two, one on each side of the paper. It's easy to insert the stem between the batting through the top opening now, while the paper is separating the two. Remove the paper and fold the fabrics over the batting.

The bottom is usually wonky and I open the seam where necessary and hand stitch or glue to shape and close. A little strip of additional batting is sometimes needed here. Done.
 I'm sorry I haven't been reading blogs or responding to comments. I have so much going on right now and my head is spinning, unfortunately in the opposite direction that I would like. When I was getting quotes for home owner's insurance, I told the agent that we are classed as a Type 2 alarm system. She asked what we have - I replied a menopausal woman with a gun. She laughed so hard she snorted. I wasn't kidding. The moods are raging!!!!
The chart for this will be posted in a few days and until then, stay safe, have happy thoughts, fabulous food, and good stitching!
Thank you for visiting!

27 comments:
You are so funny! I read the last paragraph and now can't remember what your post is about. I think I was going to tell you "thank you" for something! Did you post a tutorial? I'm still laughing.....~Ann
Your alarm system is absolutely PERFECT!!!!!!!! Loved it! MJ
Haha!! Same here only with a baseball bat! I think this pear is the best one yet! Have a happy Easter !---Jan
Beware ~ menopausal woman with a gun ~ LOVE IT!
Marly, Thank you so much for the wonderful pear samplers and the good directions.
Menopausal woman with a gun! I love it. You go girl!!!
Hugs :)
Lauren
Thanks so much Marly. I am NOT a seamstress and do struggle with these finishes.
Oh Boy, too funny. Love your 'Alarm System', Barb
Oh my gosh, I love the latest pear! And thank you for the tutorial too. (I love what you said to the insurance person! lol!)
It's 11:40pm (PDT), in bed reading your blog, my husband is watching "Pawn Brokers"... I read "...menopausal woman with a gun" ....I start laughing so hard I'll never get to sleep now and have totally disrupted Dick's tv thing....I'll be laughing for days!
It's 11:40pm (PDT), in bed reading your blog, my husband is watching "Pawn Brokers"... I read "...menopausal woman with a gun" ....I start laughing so hard I'll never get to sleep now and have totally disrupted Dick's tv thing....I'll be laughing for days!
It's 11:40pm (PDT), in bed reading your blog, my husband is watching "Pawn Brokers"... I read "...menopausal woman with a gun" ....I start laughing so hard I'll never get to sleep now and have totally disrupted Dick's tv thing....I'll be laughing for days!
thanks♥
Another cute Pear.
Thanks for the tutorial.
Marilyn
lol! LOVE the alarm system comment! lol! Thanks for the tutorial too... I'm thinking this latest Pear is my favorite design so far! Fantastic!
Brilliant and so very helpful! Thanks!
Oh my gosh Marley you got me giggling about the alarm....thank you, I needed something to make that happen this morning!
Great tutorial...I think even I a non sewer of these types of thing understood it.
HAPPY EASTER,
Karen
Great tutorial, and another great pear.
A Happy, Blessed Easter to you.
Love your delightful Pear.
You are very kind to post directions.
Rose
Fabulous tutorial Marly! You really should be a stand-up comedian. But why should you be in such a rage, time to send you some choc !!!
Keep well & Have a very good Easter!
Your posts always make me smile, Marly!! In this case--I totally cracked up at your "menopausal woman with a gun" comment to the insurance agent :)
I really hope I get my nerve up to try one of your pears some day--your tuturial is so helpful!
Thanks so much for the finishing lesson. Funny, we have the same system at my house!
Laughingly thanking you for the lovely new design and the tutorial! Enjoy the Easter holiday.
Lori
We have that same alarm system here! Thanks for a great tutorial!
Thanks so much for displaying my finished pincushion and for explaining how you assemble the pears. I've been downloading your patterns in the hopes of stitching a collection one day. Happy Stitching!
Great tutorial! Thanks for the laugh, too, I'm right there with ya!
I am loving the newest pear. Once again, thank you so much for these patterns.
I am loving the newest Pear design. Once again, thank you so much!
Post a Comment