Showing posts with label finishing. Show all posts

Aug 3, 2024

Finish

 Bingo!

Ain't she sweet?  3.5 x 5.5 inch.  I love the dmc 3831, and preferred the date in the corner rather than the birds.

Enjoy the first fricking weekend of August.

 ***********

Oct 26, 2012

Pear finish and playing with pumpkins

Hello everyone!  What a beautiful day yesterday!  Very warm and sunny and wonderful.  Today is similar but the forecast is not good.  I had my first round of leg injections yesterday, finished my pear, and played with pumpkins.  Remember the flowers in my galvanized tub?  I decided to fill a few with pumpkins around the swings. 


 I still hate fall. 
I finished the pear yesterday and wanted to show you how I did the template for the shape.  This one is larger than the last design and needed another template for backing.  Here's what I do - even though you already know!
I either use a pin to outline the shape onto a paper beneath, or my fingernail or a stylus to transfer a crease.  I only do one side and then fold the paper to cut so that each side is the exact same.   
Holding it up to the light allows me to check the shape and also center the interfacing before fusing.


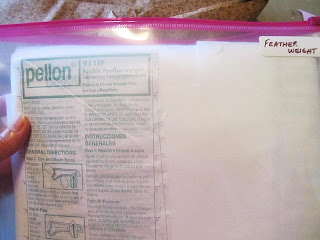
I'll say it again, these envelopes to hold interfacing with the instructions clearly shown, have been the biggest help for all my sewing.

 After sewing, I use soft sculpture needles to move the stuffing to the areas that need adjusting, and especially the closure.  The needles are really strong and work well.  I know - you know this.

I didn't use the Mylar since this size is standing nicely with just the interfacing on the linen. 
 So here's the new design that I will post for you the beginning of November.  I sure hope I can do one each month, and not run out of ideas.  I've already thought of the next two, but not sure how they will look since they are completely different than this style.   My friend thinks they are good enough to sell! 


And a few photos of the kits having a snooze in the sun.  Shameless, aren't they? 
I better get out there are get those leaves blown since it's clouding up quickly.   I didn't receive my new charts yet so I'm picking something from stash later today to start stitching.  Have a wonderful weekend - thank you for visiting!
Stay safe and stitch happy!


xxxxxxxxxxxxxxxxxxxxxxxxxxx

Aug 19, 2012

Lydia's finale and Wool

Hiya.  How is everyone enjoying the weekend?  I'm freezing and needless to say, not happy.  I'm slowly organizing and trying to get finished pieces in permanent places.  My husband still thinks Fanny Erb should be on the basket, but I have her mounted and ready to go.  France F (in the header photo) will not be moved, but Lucy will definitely be framed,  Fanny is now up in the air.  Maybe if I hemstitch her edges or line her it would change my mind. 


The pouch finish I had for Lydia just wasn't coming to me and fabric is difficult to find for DMC color 3021, so she ended up as a small pillow and I'm OK with that.  Easy to move her around.


Just in case I decide to frame her later, I didn't trim the linen, and with its heft, didn't need interfacing.  Whenever I do this, I use Craft Fleece (not batting) like this.
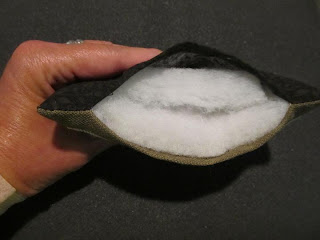
To compensate for the excess seam allowance bulk, I lay a piece of this against the back of the stitched piece, and fold the fabric over it.  It just helps a little with concealing.  Before I do this, I press the excess to the center and fold the corners over one another.  Once turned, I stick my hand in and make sure the folds are flat.


To prevent the batting from grabbing on to the fleece and moving it when inserting, I lay a sheet of paper over it, slide the batting in, and then pull the paper out.  Once again, showing you things you already know.  And yes,  I glued her shut!  I'm loving this glue method.  I don't know if other fabric glues are as easy to use as Liquid Stitch, but it's very tacky and doesn't take but 30 seconds of holding for it to grab, yet you can pull open and adjust for several minutes.  Only a tiny line is needed and I sometimes use an artist brush or Q-tip.  Now for Wool. 
I finally found the misplaced chart, stitched, and sewed.  This linen is also very stiff and no interfacing was needed.  Tough color to match so I used a black with brown print.  The ivory threads were Medici wool, and I changed the stars on the right to 642 and a gold that I dyed.  Just wanted a little color and saw gold as a good choice. 

I plan on doing the companion chart but haven't decided which linen, and whether I will use the black or gray Medici instead of floss.
 

When I trim a seam allowance and clip the corners, I always add Fray Check to the inside as a precaution.  I've made too many mistakes when sewing and don't want to worry about a corner raveling if I need to remove machine stitches. 

I used the thickest batting, which I always bevel cut so it doesn't bunch, and those excess cuttings are stuffed into corners.  I sometimes add a much smaller piece to the back, which pulls up the backing fabric so I don't have it showing at the seam.  Doesn't always work on softer pieces but this baby is stiff. 
I haven't been reading too many blogs recently, and need to apologize for not replying to comments.  Something happened to my left wrist a week ago and my store bought brace with Advil, isn't helping.  It's getting worse and typing is very painful, as is holding a piece of fabric to stitch.  To be honest, anything I do is painful!  I'm starting to get shooting pains even when it's stationary so I need to lay off everything for a week and use the bigger brace - another reason I tried to get these projects done now.  Doc appointment isn't for a week.  Maybe this down time will help me make a decision on the kitchen which is narrowed down to two choices.  I prefer one for layout, but am not happy with the doorway having to be in a bad position in the adjoining room.  So anyway, I'll be back next weekend or maybe sooner.  Have a great week - stay safe - thank you so much for visiting with me!
xxxxxxxxxxxxxxxxxxxxxxxxxxxxxxxxxxxxxxxxxxxxx


Feb 27, 2012

Surprisingly easy finish

Hello people.  Thanks for all the great comments on Overshot Heart.   It sure didn't look this small when I was stitching so I'm glad I used the 28 count for that reason also.  The linen shows through the floss just enough to resemble a woven fabric and I'd like to do another in black and a lighter mustard.  I can't believe I didn't have more trouble with finishing since heart shapes usually make my hair curl.    Here's what I did - which is probably the same that you do!
First of all, I had to extend the design to make a rounded top.  You can see this on the left side compared to the right.
I decided on Craft Fuse and I gotta tell ya, I am so glad I'm storing the interfacings in these folders.  They were always mixed up along with the wrong directions.  The last one I used was dry iron - no movement, and this one was circular motion and steam.  Go figure.  The craft fuse really gives a stiff look and feel and is quite heavy.  After fusing the linen and the backing, I ran my finger nail along the stitched edge and it created a line for my machine to follow since I wanted no linen showing.

I stitched around the entire heart and made the point square by one stitch instead of a sharp angle.  Then I slit the back open!   I couldn't use the envelope method with this shape and for more primitive pieces I some times would slit the back and use a muslin patch.  The heavy fused facing prevented the fabric from tearing open even more when trying to turn it right side out.  Before doing that, I pinked the seams instead of clipping/notching, and I cut a piece of quilt batting to fit inside the stitches, and then cut the edges on an angle to bevel the bulk.


Once turned right side out, I inserted the batting and used a few more pieces where needed, made a patch, and used the double fusible (Trans-Web) to glue it.   
You can see that it's not very puffy, but enough, and I steamed it when completed.  So where do I put it now?  I still may attach a hemp cord and hang it but started playing around to see where I'd like it. 
Why I did this, I don't know.  But if you have some beautiful smalls you want displayed, this may not be a bad idea.  Fill a glass cylinder with the pieces and something pretty in the center to hold them.  Those large glass beads used in floral arrangements?  Wood somethings for rustic?  Honeysuckle vines and pussy willows?    Too bad I like beat up dirty looking primitives cause I'm picturing some beautiful displays!

I'm working on Santa now, stuck on Lucy, and will pick another sampler.  I saw a few must haves that just came out and Threadwork Primitive's Chelsea's Pinkeep is certainly one.

I'll leave you with the two little devils sticking their heads out of their cat condo.   The baby has a white spot on his mouth that I always thought was a piece of the styrofoam box they live in.  It's not.  He's an odd little guy.  I never saw round eyes on a cat before.  One more thing - Bath&Body Works' candle sale is today.  I got my Aromatherapy Orange Ginger - amazing fragrance. 
 Have a great week - a big thank you to all who participated in the drawings - and for taking the time to visit with me.  I will have a few of the small oval sets for sale probably the end of week and will let you know.  Thank you again! 

Nov 11, 2011

Still at it!

Hi all.  I'm still experimenting and making mistakes as I go along, mostly because I am impatient, always looking for the quick way, and skipping steps.   I spent a good deal of time reviewing VONNA's BLOG dedicated to finishing.   Well worth your time if you haven't visited previously.  She stresses that taking your time and paying attention to details is key to a nice finish.  I'm like a fly with no place to land.   Reading her finishing blog made me realize that all these different methods are great choices, but without proper execution and preparation could be very frustrating.  First of all, using a measurement guide and a rotary cutter starts the project with perfect size and accuracy.  I have those tools.  Somewhere.  From now on, I plan on starting my projects as she recommends.  Today, I worked on the largest project and a medium size and am happy with the final results.


And here's the box remodel.  You knew I was going to change it didn't you?    I took the entire piece off by reheating the fusible facing which allows it to be removed, and pulled the ribbon off.  Using a fusible fleece between the box lid and the fabric gave it a little softness without bulk and it looks better.  I reglued the side edges and then ran a continuous bead along the rick rack.  I painted the box the barn red of his jacket, and the trim is a little darker than his jacket.  It looks terrible in the photo which seems brighter and bluer than the actual colors.  Cute huh? 
 But it's not my style so he's going to live with my sister.   I've tried to understand what attracts me to the colonial/primitive style that I love.  Staining samplers and quilts with coffee and walnuts, beating wood pieces with hard objects for dents, stabbing with sharp objects for holes, scraping and deliberately peeling off paint, and generally making it look dull dusty and discarded.  Is it really because I hate to dust and clean?  Beautifully waxed and smooth finishes reflect the light and show every speck of dust and pet hair the minute it lands.  Go to the home of a primitive lover and you don't know if it's dust, or a finish that took hours to create. Are they terrible housekeepers?  Or great craftsmen?  No one really knows - and that my friends is the beauty of primitive style. 

I have to mention that I used to make my own clothes, including designing and sewing both prom gowns.  One was a fitted spaghetti strap satin slip under a sheer organza long sleeved satin edged gown with large organza flowers from the knee down.  Gorgeous.  And here I am fretting over finishing these stitched pieces!  That was a very long time ago in the land of patience and youth. 
Now for the finishing of the large Santa. I fused the stiff interfacing before stitching and included it in the seam.   I used a quick press on the edges of the facing so it wouldn't be completely fused and it lifted for trimming later with no problem.  You've seen in prior posts that my fabric edges are, shall we say, random.  So this time, I found the see through ruler (but not the rotary cutter) and measured from the stitched edges about 1", and marked it with a pen on the front side.   Then I ran a line of stitches on the pen mark so I could see this guide from the back side since I can't see through the facing.   I used that line as a guide for the edge of the presser foot and it worked!  I had a centered and balanced design with straight seams.  Then I pulled the facing off in the seam allowance and clipped it very close to the seam. 

I clipped the corners and pressed the seams open, and because I used a very heavy backing fabric, I didn't line it with facing.  Once it was turned out, I thought it required more structure so I ended up fusing the Decor Bond to the backing fabric within the seam lines.  Better.  Four layers of quilt batting filled it nicely.  I glued the bottom hem closed and attached the brown cord with glue also.  Wacky Angel has the Craft Fuse on the entire piece of linen including the seam, but the backing's facing is within the seam lines only.   I think it came out great.  I'm pleased - which my husband has always claimed was impossible so there you go.  I plan on using the Craft Fuse from now on unless it's a really primitive piece or pincushion.  I like it sewn in the seam and then trimmed, and it also bonds the fabric so I don't have to worry about clipped corners fraying.  I think I've found my go-to method.  For mounting on a board with or without fleece, I've practiced mitered corners and will use this method.


It makes a nice flat corner with all raw edges covered.  The last tip I received was from Joy about using muslin as a liner instead of interfacing, and that's what I will do on the more primitive pieces.   I'm anxious to try this but all I have to complete are Santas right now.  Time to get back to stitching!!  So that's it folks.  The end of the finishing adventures, but I said that about bleaching and dyeing my linen yet I kept going, didn't I!  To everyone that sent me suggestions, their secrets, methods, and favorite tips, I thank you.  I've learned a great deal, and more importantly, that stitchers are always willing to offer help to fellow stitchers.  I'm sure there are more blogs to search for additional tips and I will find them all eventually.  For now, I'm feeling pretty confident in being able to complete my projects.  No matter how many times I change them.  The PA redware piece I completed recently and make into a pillow is now at the framer.  It's being mounted with hemmed edges on matboard which I already did, and a simple flat frame.  I almost fell over from the price of this very small job.  I planned on framing Fanny too but I'm cheap and it will take me a while to recover.  I may be going back to making my own frames.
I see that my followers have increased and I'm thrilled.  I thank you all very much and hope that you continue to find something of interest, and if not, please let me know.
Have a wonderful weekend everyone.  Thank you again for visiting and sharing!

Nov 3, 2011

Finishing a freebie!

Hello people!    I'm still playing with interfacing and decided to try a shape without corners.  Since I don't have any - that I can find or remember stitching - I made one up.  And guess what?  I don't like it.  I used Jobelan for the project as a test for the Santa ornaments.   I would have much preferred one floss color for the alphabet on an unusual linen color.  And after all my bleaching and dyeing - I have that!    Instead, I picked five fall colors on sage Jobelan that was later coffee stained. 

I'm going to post the chart and template at the end of the post if you would like to stitch the pear.  If you don't want to be bored through my photos and routine instructions, just scroll down.   Blogger has changed the format when you click on a photo but you can still right click to print or "save as" when the new page opens.
*******
Please understand that posts sharing my experiments or trials certainly are not meant to imply that you need my advice or that I know it all.  After 25 years, I'm learning again, and dragging you down with me!  I get emails from readers asking for more clear information on subjects, as well as emails telling me the mistakes I am making, or suggestions to help.  So I'm learning from you while I'm sharing my progress.   
*******
    After I stitched the piece, I used a marker and just followed the outline at least an inch from the stitches on one side.  Folding it exactly in half and then cutting on the outline gave me evenly matched sides, then stitched right sides together to a piece of felt. 

I used my presser foot as an edge guide and I could have sewn in a little further for a smaller piece.  Now to cut the facing.  


I placed the pear over the facing and used a thick needle to pierce through the seam, poking holes in the facing beneath.  You then have a perforated outline to trace, fold, and cut.  I had trouble seeing the holes so I placed a dark fabric beneath.  Minor adjustments and cuts were made to fit inside. 

 After pressing the Decor Bond, I decided to hem it a little higher and had no problem pulling the facing off the fabric a little and cutting more off.  If you need to make an adjustment, reheating with the iron will allow the facing to be lifted, repositioned, or cut.  Pressed the seams open and turned it out.  No facing on the felt, it stood by itself, and held the shape nicely.  

I'm using quilt batting again instead of the loose fill and just cut to fit the shape.  Pretty easy finish once again!  Now I'm anxious to see how both coarse and fine linen work.  I did finally get a silicone finger to prevent burns when ironing seams open and it worked fine.  (And hid the crooked bumpy joint.)


 So here's the chart if you would like to stitch the pear shape along with the template.  I had a heck of a time trying to get this to scan properly.  Click on the chart/template, then right click and hit print and it should print the correct size.  If not, try "save as".   I must have used half a ream of paper testing the copies and scans but I did get a nice fire out of the deal.   I'll test again once it's posted and if it doesn't work, I'll try again.  Your seam will be stitched inside the template, width depending on your seam guide.  Don't forget to add a little rolled piece of felt/wool for the stem, or a real one!  Add the little leaf and there you go.  I think I will stitch one on my saffron linen, a greenish shade, and a darker brown, all different thread counts.  Several sizes and colors in a display might look pretty darn nice.  And if not, they'll make a nice hostess or exchange gift. 
Hope you like this little freebie!!!  
Thanks for the visit.
Oh!  One more thing.  If you're a Yankee Candle fan, they are having a buy 2 get 2 free offer on their large jars and tumblers.  Go to their website and use code CATH211 or I can email a coupon to use in participating stores.  Great holiday gifts for a good price!


Related Posts Plugin for WordPress, Blogger...