Aug 8, 2013

My apologies to you

Hi all.  It seems that I've upset a few needleworkers with my crude methods.  Sorry.  But here's how I feel.  If we all had to follow the rules and only stitch using proper methods, some of us would not stitch at all.  Working a small project is the perfect opportunity to try new things, experiment, practice, and give us an idea of how we would manage a larger project with these elements.  If we have some difficulties, changing the method to match our ability (or patience) still allows us to be stitchers and create.  Just as a youngster brings home a wonky work of art, they are praised for effort.  Yes, there were instructions to follow for their creation, and they followed the best they could, improvising to complete their project.  Same here.  We're learning, wanting to create these pieces that catch our eye and allow hours of relaxing enjoyment, not nerve wracking tedium or a test of our skill.  I will never be a rule follower when it comes to stitching, because I am not always pleased with my end result, frustrated, and many times tempted to burn, flushshred, toss the entire project. I have no desire to change the way anyone stitches, just to show that some of us feel free to wing it.  We covet the old samplers with misspelled words, missing stitches, uneven borders, mismatched rows, so our execution of these pieces or others, should be just as much ours as theirs was theirs.  If I do a stitch incorrectly or fringe instead of frame, I am not trying to get others to follow, or become a bad influence to beginners.  I am only showing you ....... ME!!!  Wonky, menopausal, bitchy, emotional, animal loving, nail stepping, indecisive, sampler loving stitcher who needs a facelift.  Me. 
A woman who is keeping her current project in a styrofoam container from the grocery store.  Easy to keep it all together, protected from tabletop spills and construction mess.  But not what you would normally keep your projects in.  Key word - normal.
 
 
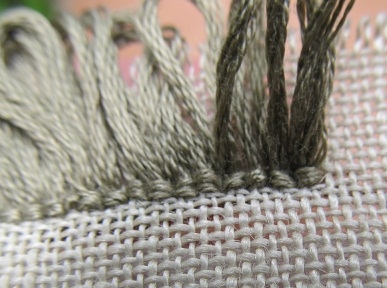
But because I think the world of all of you and so appreciate your friendship and help, I will show the correct placement of the turkey stitch loop according to other videos I have watched.
First stitch is down through the linen and the floss end becomes part of the fringe.  Then anchor stitch.


 For the basic loop, come up into the next hole from the anchor,


 and go down in the center hole behind the anchor, pulling through to create the loop.


Do the anchor stitch by coming up in the hole to the right of the loop, and go down into the same hole as the anchor stitch right edge. 
 
You end up with each side of the loop behind an anchor stitch. 
Correct?  If not, forgive me cause baby that's the best I can do!  I can't wait to finish and cut the loops. 
Still easier that my original video method of going left to right and coming UP behind the anchor
instead of going DOWN.
 
 Now - here's the boys.
And the blood.  I got my tetanus shot, antibiotics, came home, and stepped on a staple coming out of the old carpet that we took up and turned upside down to protect the floor.
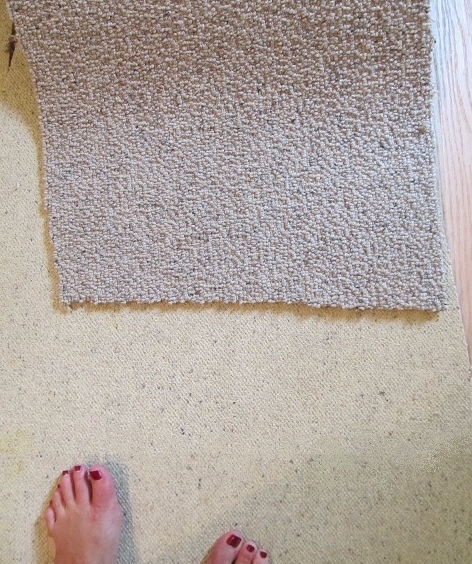
This was the old wool loop and I loved it, but it matted more than any other carpet I ever had.  I really like the very abrasive backside and wouldn't mind carpeting like it.  You can see my swollen left foot and the band aid on the left edge from the staple. 
Bean watch!!
It appears the string has shrunk to half its original length and bean size.  My second string is completely different.  This is day 4 and hardly any change, whereas the first batch dried quite a bit by this time.  They appear to be getting lighter.  YAY!!!  I hope so.
 
 We've had a very long day and are exhausted from all the cleanup.   My battery is drained - computer and body. 
Enjoy your weekend - stay safe - stitch happy!
 
Thank you for stopping by.
 
xxxxxxxxxxxxxxxxxxxxxxxxxxxxxxxxxxx

Aug 7, 2013

Turkey turnaround- lots of photos

Hey!  Two in one day.  But I confused the heck out of you with the first one.  OK.  Here's what I'm doing now, right or wrong, it's working out a lot better.  Much better.  When I watched the video, the needle was coming up left and going down right.  As I mentioned, when I switched that, the back was very bulky. 


But I tried again and changed the stitch slightly.    I come up to make the loop in the next hole so one linen thread is between the prior anchor stitch and new loop.


Make the loop, and go down into the hole to the left of the loop, which is one linen thread back, and the same hole as the anchor stitch. 


Pull through, keeping the loop size you want, and come up one linen thread to the right of the loop.


Go back to the left again, crossing over the front of the loop, and go down in the same hole that the loop and anchor stitch are in.
Pull tightly to form the anchor stitch and then start again!  When the floss piece is ending, bring it back through to the front and trim to the fringe length.
 Here's the difference in the back.
BIG difference in stitching time for me and also neatness.  This is the mess from using the first method and all the split thread.
Now they are neat, or at least close to that.
So here's the difference.  First method called for the loop to be two linen threads over, in the center hole behind the anchor.  I'm only moving one stitch over, and the loop is entirely in the anchor.
 
So there 'ya go.  The wrong way to do the turkey trot but my preferred method.  Next time, it will be backed with linen and this stitch will go through both fabrics at once, finishing it as the turkey is created.  Do you think my friend will mind my wonky fringe?
 
My husband is insisting on a tetanus shot tomorrow so I called and asked how bad they hurt!  She said it will hurt, but three days later it will be difficult to move that arm and very sore.  Whatever.  My foot is so swollen my toes are pointing up and causing a walk similar to a Weeble.  If it walks like a duck and quacks like a bitch.....it's me.
 
Adios!
Thanks for visiting!
 
xxxxxxxxxxxxxxxxxxxxxxx


A new mug, a new bug

Yep.  Workers here two days in a row and possibly even tomorrow which will finish up the floor.  Except of course for the sanding and staining and sealing.  I don't want to sand - can't take the air full of dust.  Don't want to finish, just oil.  Husband's not happy with either so the conversation continues. 

While sitting out here with the fire I thought I would work on a little stitching.  This turkey trot is fowl foul.  I love the look, but not happy with my method.  I am working left to right which means the needle comes up from the back through a hole from a previous stitch.  With six strands of floss, it's almost impossible to not split the anchor stitch (the one going across the front of the loops to secure them), and also to have the anchor stitch appear even.  Each strand has it's own tension and they don't lie together.  Laying tool doesn't help much.  Many times I came up in the wrong hole and pulled out the prior stitch which had been split by the needle so I ended up with knots and all kinds of crap. 
 So I started working right to left which means I come up in a new hole, and go down into the threaded hole.  It can still split the floss but it's not as noticeable as coming up through it.
 The problem with this easier method, is the back.  I'm basically going over the back threads of a previous stitch, so that's 12 pieces of floss which created a really thick line.  That brings up another question.  How will I attach the backing?  Machine sewing in the ditch from the top will certainly not catch the backing fabric the same on all sides.  I can't fold the fringe in towards the center and sew right sides facing because the anchor stitch lays it to the outside edge.  I think the only easy and neat way is to use linen, wrong sides together and fringe the edges into the floss like the original.  Hand sewing the backing on - believe me - would not be neat.  So it is too late?  The backing linen should have the stitching from the front showing and it's too late for that.  I guess I will have to run a line of this color floss and then hand sew front to back.  I should have thought this through before jumping in.  Stitching the easier right to left with the fat back side threads would have been fine showing on the other linen piece.  You know what?  If I wasn't actually doing this stitch, this post would be confusing as heck. 
 I have to think.  Right now, after removing the bug, I have this...a leaf.  And I'm hoping the Advil I'm chewing for this aching neck will help the pain from this.After meeting up with this.  I'm wondering if the fire can melt the hole shut in my Crocs.  By the time I got to the house,  there was so much blood it was coming through the hole when I stepped so the plywood beneath the new floor has a red polka dot pattern.  My mom loved polka dots.
Have a great day and watch where you step!!
 
xxxxxxxxxxxxxxxxxxxxx


Aug 6, 2013

There's a bug in my coffee

Hiya.  I'm sitting here on this beautiful morning tending this


because of this.
This was unexpected and rushing around early this morning to move more items and prepare, has left me with no idea where anything is.  I've run out of rooms to stuff with other room's things!  If this project was worked on every day it would have been done and the mess lived with for a short time.  You have to wait for contractors as you all know and some weeks you don't see them at all.  I just want it over.
I want to show you what I did with my fat quarters and larger pieces that were all over the place. 
 The thicker foam core board that is used for mounting was in my way, but I had an idea.  An old chest of drawers now holds all the fabric neatly. 


I cut the foam to fit the drawers as dividers just a hair longer than needed.  They're snug and in place.  Cheap solution to not having dividers without needing any tools except for a utility knife.
 
 
I also strung more beans.  Here is the new one above the first, and look how much they shrunk.
 
Your bean watch close-up, day 4.

 
Not taking long at all.  I've seen strands for sale that are light in color which is what I prefer, but these will be dark.  I've looked locally for yellow wax beans but haven't found any. 
 
So now I will get the bug out of my coffee with my dirty ashed fingers.  I'm so tired I don't really care.  The fire's heat has taken the hair off my legs, softened my Crocs, and quite possible melted my contact to my eye.
 
Have a great day and thanks for visiting!

Aug 4, 2013

Turkey trot

Hello guys and dolls.  How's the weekend going?  Fast, huh?  Well so is summer and I'm not happy about that. 
When I was finishing the latest friend pillow, it dawned on me that (long ago) I wanted to try fringing a small piece like my Christmas pillow.  Remember this one?  The backing is the same linen, and the edges of both sides are included in the floss fringe.  My linen was a small piece and I stuck this in my bit of green dye jar (to remove the pinkish cast), shook it up for a minute or two, and came up with a new color.  No way I can do another piece and have it come out exactly the same.  But as I'm typing, I realize it doesn't have to match and could be completely different.  Hmm. 
 Anyway, if someone could direct me to a better way of squaring borderless stitchery for finishing, please pass it along.  Here's what I do - for those of you that cringe at my recklessness, skip this part.
I use a Sharpie pen to make a dot on the linen at the same distance from the last stitch on all four sides (further out than I plan on seaming).  Then I remove a linen thread at the dot to get a straight line for trimming, and cut the interfacing to the size I would like the finish to be.  In prior projects I needed to reposition the fusible because the linen was stretched a little off kilter.  Now, I keep the stitched side up with the fusible beneath and make sure the linen and design is straight, using the pressing cloth, fuse for a few seconds enough to hold it in place.  If all is well, then I turn it over and complete the fuse.  I sewed the backing along the edge of the fusible and then remembered the fringe.  Took it off - here we go.
After watching a few online videos (including Mary Corbet's Needle 'n Thread) for turkey stitch, I began.  Instead of using all the colors in the piece like the Christmas pillow, I chose to use one.  OK, I forgot.  Since you sew with all six strands, it's easier not having to separate anyway. 
 
I'm not happy with my work.  It's hard to go into the same hole that six threads already occupy with another stitch covering the front.  So they aren't as nice as my inspiration piece, but the second row which goes in front of this one may be better.  Do I really need the second row?  Could I use 3 or 4 strands to make it neater?  Of course.  Following rules is not my way, mainly because I can't remember them, but also because I have no patience.  And I'm a rebel.  The Jane Dean of stitching.
But what about the other fringe edge I did using the nun stitch.  Flimsy, but it's a finished edge to fringing.  If I choose a darker linen for the backing and fringe them both, it will be variegated but still flimsy.  So what?  I think the nun stitch is good looking and I can do it in the darker color.  So now what?  I think I'll finish the turkey and try the nun on another one.  Both are fairly easy to do, just time consuming.  If I would have just kept the backing on and went about my mess cleaning, I would have been done yesterday.
And for those interested, yes, you can reconstitute the dried beans for soups in the winter.  Search online and you'll find a few recipes and methods.  You can soak them overnight, or put them into simmering water, add a ham hock and other veggies. 
 
 
Bean watch - day three. 

This was kind of long wasn't it?  I thought I grabbed the decaf bag but maybe not.  My heart will let me know shortly.
Enjoy your day - stay safe - welcome to new followers!
Thanks for visiting!
 
xxxxxxxxxxxxxxxxxxxxxxxxxxxxxxxxx
 

Aug 3, 2013

Leather britches

Greetings.  How's the weekend going?  Are you finding the things that you had in your hand a minute ago and magically disappeared?  Are you carrying these items with you like they are stuck to your hand and depositing them elsewhere, a place you would never think them to be?  Are you getting frustrated while you climb over tables, chairs, stacks of flooring, bakeware, and stitching supplies?  Are you wondering if someone deliberately took it while a hidden camera is studying the detonation timetable of menopause subjects? 
WELL ARE YOU?????
So these are leather britches.
This photo is from York Mountain Primitives where you can purchase a strand or two.
 
A long ago method of drying beans for winter use which is so simple.  I saw several photos of buttery and kitchen cupboards with a long strand across the top as garland or hanging straight down along the side.  I couldn't find any really long ones so I decided to try making my own. 
 You can string them from the ends so they hang straight down but I prefer the center.  Robin featured this string on her blog The Cranky Crow.
 
I used a large doll making needle with cotton string to pierce the beans.  The smaller needle worked just as well, but the larger created a hole large enough to move them along the string easily, so I can slide them together as they shrink.
 

Here's mine drying in the garage.  It's pretty heavy right now and I used over 2# of fresh firm beans.  Allowing it to hang straight down will probably give me a better result.
I made another little pillow and changed the blues to rusty browns.  I'll probably do another this evening and maybe put the crowns from the sampler design within the heart.  It's such a quick and fun stitch!  This afternoon I will muddle through the mess and pull out the sampler charts.  Choosing the linen is harder than the design. 
I need to continue my search for a few items but taking time for the swing usually calms me down.  My single seat one that we had made for mom will go really high and the more uptight I am, the higher I go.  It's time to crank it up!  One day Mark will come home and find me sprawled out on top of the arbor. 
Thanks for visiting ~ enjoy your weekend!
xxxxxxxxxxxxxxxxxxxxxxxxxxxxx


Related Posts Plugin for WordPress, Blogger...